Tuesday, November 30, 2010

Cheap and Easy Advent

I seem to always remember that I need to make an advent calendar for my family around the middle of November. I knew I would not get around to it again this year, so I decided to go another direction.

I saw these little gift boxes at the Dollar Store (in the wedding section) and started thinking. I bought 2 pkgs. of little boxes (12 in each), 2 tubes of baubles (12 in each and in 2 colors, one for each kid - to avoid fighting. Well until Bubby thinks he needs to help too.) and the tinsel rope. So, I spent $5 on supplies. I had glue, ornament hooks, and Christmas scrapbook paper (one had a Christmas countdown on it, and I always wondered what I was going to do with it), in my supplies.

I spent a few hours one evening, cutting gluing, and folding the boxes together. I think it was very easy, fairly cheap and the kids are super excited.
So, what kind of things do you put in your advent calendars?

Let the countdown begin!!!

Monday, November 29, 2010

Christmas time is here

I have actually been very busy crafting the past few weeks, but I can't share my creations yet. I have been busily making Christmas presents and I don't want to spoil the surprise for anyone. That said, I have had lots of fun, and I still have lots more to do.

I made this sweet little crochet hat a few weeks ago and I fell in love with the pattern (didn't my sister take a gorgeous pic of K?). So simple and so very sweet. My fabulous sister-in-law said she would love the pattern, so....
Here is a link to the pattern. I found it doing a search on Ravelry. If you are interested in yarn arts (knitting, crochet, etc). this is definitely a website you will love. It is free to join, and you can search and save the patterns you are interested in trying (free and purchased patterns). You can also share pictures of your creations and explain any difficulties you had (I have found it VERY useful to find out where other people have had problems and how they fixed it)

I have made a few more hats (like I said, for gifts) that are on my Ravelry page. If you are interested in looking me up, my name is Mury.

Hopefully I can add a tutorial on my fun and very inexpensive advent calendar very soon (if my kids don't destroy it first).

Enjoy, and good luck in your Holiday crafting!

Wednesday, November 3, 2010

More little dresses

Do you remember this easy little dress? Well, I finally made some cute little under clothes to put underneath. I just used my favorite pattern (Simplicity 5695) to make the little shirt. For the pants, I traces a pair of pj's on freezer paper and added 1/2" for seam allowance and 1 1/2" or so on the top for the waist band. They actually came together really easily. After they were sew, I added three layers of ruffles to the bottom. (I think they were 3" long and double the width of the pants. I serged the raw edges and then gathered and stitched them on the pants.)

I also made her a little simple dress using the Simplicity pattern. I made a sheath type dress (just a long front and back, no attached skirt) and just added ruffles to the bottom (same as the pants). One note on my fabric choice. Can you guess what it is.....that's right a sheet. I needed something with a little polyester in it so it wouldn't wrinkly like crazy and (like 100% cotton would). I bought one twin flat sheet for $3 and it made the pants, shirt and under skirt. I have washed it, and it washed up fantastic and it is still soft.

I have a white sheet too and I think it will be fantastic too. I plan on making more little dresses (in Fall and Christmas patterns, so excited) K also wants a blue Belle dress (the peasant dress Belle wears on Beauty the the Beast), and I think this patter will work wonderfully.
Here is my little princesses Halloween costume. Can you guess which pattern I used? Simplicity 5695. Now when I say that is the pattern I used, keep in mind that I lengthened the bodice, skirt and sleeves, added the ruffle to the bottom of the sleeve and used shirring around the neck, sleeves and in the back. Here is the link for the flower. It was really easy, and fast (my new favorite). I tried to make a bigger flower by making cutting it wider and longer, it was too much.
A few of you have noticed that the pattern does not go past a 3T (I think?). I have been modifying my pattern so much, I didn't notice :) But here are the bigger girl patterns that are the same concept. Simplicity 2377, McCalls M6062, and I fond this one at a thrift store Simplicity 5222 (not sure if it is out of print). So, keep your eyes out for pattern sales. Good luck.


Tuesday, October 12, 2010

Yes, I am insane

I know this costume is time consuming, but it is so dang cute! I thought I would share where I got the patterns.
The body suit (I obviously did this in one color and I also did buttons instead of snap tape. The pattern has a few flaws in it, so be sure you read the whole thing first and look at the diagrams)
Hat (I added different colors to the top, cream and red, and added a pom, pom on top.)
Booties (I don't think I actually had a pattern, but you can google crochet baby bootie patterns or go to RAVELRY to find tons of patterns)
Ears- I made 4 ears, 2 tan and 2 cream. Then I put a tan and a cream together and sc around the outside of the ear. I left a long tail at the end and stitched it to the side of the hat.)
sock monkey doll (How cute is this little guy? I added a bell to the inside to make him more interesting. I also crochet eyes on him for safety reasons.)

It really wasn't that bad. The crochet went quickly, but the assembly was slow. On a side note, if you are interested in knit or crochet you should check out RAVELRY. It is a fantastic place to find patterns and to see other peoples' creations.

Wednesday, September 15, 2010

One pattern, so many dresses

I thought I would share one of my favorite dress patterns with all of you. This is my FAVORITE go-to patterns with so many variations. With Halloween quickly coming, here are a few of the dress variations I have made.

I use this Simplicity pattern (5695 view E) , and poly satin from Hobby Lobby ($2.99/yd. and it is AWESOME to work with and washes really well. NEVER buy the Wall-Mart stuff. I usually need 1 yd for a simple dress and 1 1/2 yds for a fuller dress). Before you jump in and cut out your fabric make sure you measure your little princess and check it against the pattern. I have made my own pattern (using the original as a guide) and I made the bodice longer and thinner, the sleeves longer (they are pretty short in the original) and lengthened the skirt depending on the look I want (my little one is very tall and very thin). I also really like to use elastic thread to do shirring on the neck, sleeves and waist (but you could use regular elastic like the pattern says).

Whew! Okay now the fun.

This is the wedding dress up dress I made for K's birthday. It is a very simple dress with shirring in the neck and sleeves. I added satin poppies around the collar (she added the belt). The veil is just a bit of tulle that I folded in half, gathered, glued on a head band and added satin poppies on top.
Snow White. This is just a basic dress, with different colors. I cut a yellow skirt, dark blue top and light blue sleeves. After the sleeves were cut, I used fusible web tape and used it to iron on red ribbon in stripes down the sleeves. Before I attached the bodice to the skirt I added some gold braid trim down the front of the dress. (K informed me that I left of the big white collar and cape, but oh well. And don't you love how happy she looks).
This is K's nutcracker dress. It is just the basic dress with a long skirt. At the bottom I gathered a 5" strip of black satin (cut it 5" long, and it should be twice as long as the bottom of the dress) ruffled it and added it to the bottom of the dress. I then added a sash out of a long pice of black satin and added satin/organza flowers to it.
My little Beauty (although she was a bit of a Beast that night). Okay, this one took more work but was still pretty easy. The quick version, just a basic dress using view F, I shirred the neck, sleeves and waist. I also took the top layer of the dress and gathered it up a few times(just took a needled and put a few stitches in to gather it up a bit). The neck/shoulder piece was actually the most difficult. I made a tube a little bit bigger than the ungathered neckline. I gathered it in three spots and attached it to the front and back of the dress and added a flower to the front (if you need details on this one, let me know)
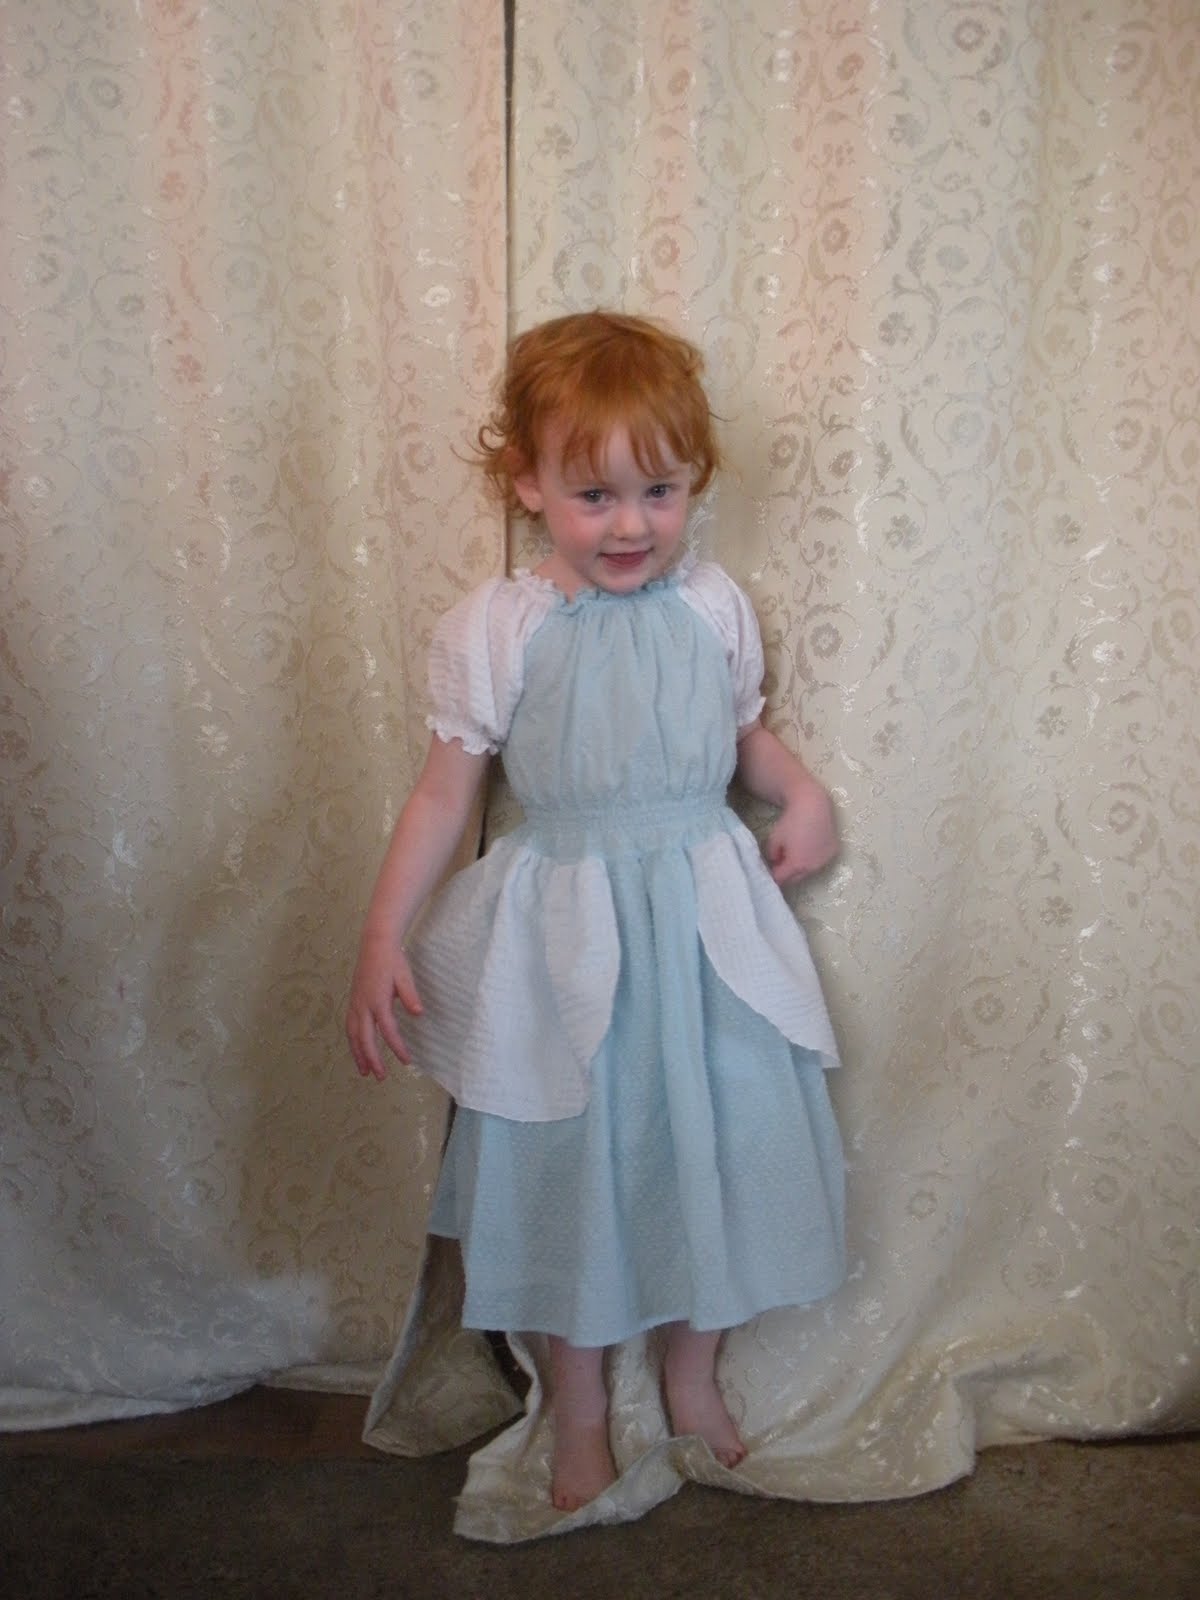
Cinderella (now too small, so sad) was made out of cotton for a fun Disneyland dress. Again it is the basic dress pattern with shirring at sleeves neck, and waist, just add white sleeves and the white bustlelie thing at the skirt (it is just a skirt shorter than the bottom layer and I cut it in the middle and rounded the corners).
I loved Tinkerbelle. It was made the same as Cinderella. I just changed the skirt a bit. I made a template for this one using freezer paper I traced out the skirt pattern, cut it shorter and made the scalloped pattern (so it was evenly spaced, it took a little math).
Okay, I hope this helps those of you who have asked. I know it is all a bit jumblee and confusing, so if you have more questions please contact me and I will be happy to help. The real trick is to just use your imagination. If you see a dress you like, just think of how you can de-construct the pieces into different colors and shapes.

Good luck and happy sewing.

And yes my daughter is sooooo very spoiled.

Tuesday, June 22, 2010

K's new "In the Garden" dress

I came across this blog (From and Igloo) the other day, and I knew I had to make that dress for K. Luckily I had also found some fabric that I loved. Here is my end result.

Here is a picture of the back. You can see that the dress ties through a button hole in the back of the dress, so easy and so cute. The back is also made using a technique called shirring. There are lots of tutorials on shirring but this one is the one I initially used. It is just basically using elastic thread in the bobbin of your machine and sewing. It is sooo cool. The fabric just gathers as you sew. (As a side note check out this blog if you have a Brother machine and have struggled shirring, this saved me from throwing my machine out the window.)
Here is the front of the dress. Christine at From and Igloo did a great job with the instructions, it is basically a formula you plug your own measurements into. K is insanely skinny, and tall, so I could make this dress long and slender just for her. The straps are also adjustable in length so she should be able to wear it for awhile. (It would have been better to have my little model wear the dress, but you get what you can get)
The dress was really easy to make, I did it all in one evening. You do need some basic sewing skills, but her instructions are pretty good. My only change is I used a serger for the inside hems, but that is it.

Have fun!

Thursday, May 13, 2010

Pumped Up

Those of you who have been in my home know it is definitely NOT fancy. Old, would be putting it mildly. Because of that, there are times I feel like a shinny new something looks out of place.

I wanted to get new soap dispensers (when I say "new" I mean not the plastic bottle it comes in), but they all looked to fancy for my little old house. This was my solution.


I decided to use an old canning jar and just attach a pump to the top. This was a super easy project, and as usual FREE.

Supplies:
canning jar and lid (whatever size you want)
old plastic soap pump container
drill and 1" spade bit
spray paint
liquid soap
a handy husband helps too :)

Here we go. First you need to cut a hole in the top of the lid. (This is where my handy husband was awesome) Kent used a 1" spade bit to cut a hole in the lid. This was the most difficult part of the project because the lid wanted to spin while being drilled. Kent clamped the lid on a scrap piece of wood. After it is drilled make sure the lid will fit over the INSIDE ring on the soap dispenser. Spray paint it any color you want.

Now you need to cut up your soap dispenser. I had an old face soap container that was easy to cut up. Carefully cut the container apart. You want to make sure you cut the inside ring out with a little around it. (See the photo below) This is how you attach the pump to the jar.

Now just assemble it together again. Put the inside ring through the hole in the lid, screw on the pump, fill the jar with soap, put the lid on the jar and screw the ring on. Ta Da! You could embellish the jar with ribbon or something cute like that, but at my house I think any extras might get pretty grimy.

Have fun.

Wednesday, May 5, 2010

Shrinking Silhouettes

I've noticed that those cute silhouettes we made in grade school seem to be everywhere in home decor. Cute little cut out heads on walls, pillows and all kids of stuff. I love the idea and was trying to come up with a fun way to wear my favorite little silhouettes. Here is what I came up with. Cute right? Want one? They are super easy and extra cheap. Mine was made from things I had laying around the house.
Supplies:
plastic container with recycle #6 on it
sharpie or other permanent marker
nail file (or fine sand paper)
picture to trace
9 or so jump rings
beads and head-pins (I used broken or mismatched earrings, already done so no extra work)
necklace or cord (Oooo ribbon would be pretty too)


That's right folks, it's a pre-made pie crust. You get to eat the pie you make, just save that plastic lid. You can use any plastic contaner you find as long as it has the recycle #6 stamp on it (you know the little triangle arrows with a 6 in the middle). So, this part of the project is FREE! Just use something that was going in the garbage.
Next I took pictures of my kids profiles and printed it out a contact sheet so they were nice and small. I then cut my pie lid up into square that would fit the pictures. My squares were about 1 1/2". File the surface a bit to give it "tooth", it will help the ink stick better. Next trace the sweet little silhouettes with a permanent marker, then completely fill in the head space. Then punch a hole in the top with a standard hole punch (So make sure you leave enough room at the top). I rounded the corners on mine too, just to get rid of anything sharp that might be by Bubby's face.
Pretty easy right? I actually redid D's picture, the lips turned out funky the first time. The awesome thing is there was more plastic to use so no big deal. Now the super cool part. Put the cut plastic on a foil lined baking sheet (shinny side up) and bake it at 350 for 3-4 min. Don't panic when you peek in and the plastic is all curled up and distorted, it will flatten out. In fact, that is how you know it is done, take it out when all the pieces are nice and flat. Let it cool for a second, and you have cute little charms.
Now you can assemble the necklace. I put a jump ring through each charm. Then I used old broken earrings (Never throw out your broken or incomplete jewlery sets. I find so many uses for one old earring), and other random beads to make some pretty danglies. To construct the necklace I used 8 jump rings. One on each, charm, one on each danglie. I then connected all the charms and danglies together using the remaining jump rings. I tried to form a small chain with mine so the charms would hand down.
Now put it on a chain (you know you have some unused necklaces hanging out in your jewelry box just needing to be used). Put on a cute t-shirt and admire your handy work.

(I think it it funny that Bubby has an Alfred Hitchcock profile, and K's little pony tail is so sweet.)