Wednesday, February 9, 2011

Shirts Galore

I've been having more fun with my Silhouette machine, but this time I was not alone. My amazingly talented friend Kinsey, joined me in a shirt party. Sadly we spent so much time taking care of crying babies and getting the machine regulated she didn't have time to paint hers (she said she can do it at home easy, but I still feel like a schmuck). I cut out the designs on freezer paper, we ironed them on the shirts and then we used Kinsey's fun fabric paints. The process was pretty quick and super fun.

Here are the super fun shirts I made. I am planning on giving them to the kids for Valentine's Day (you'll see more on Kent's shirt), and I think they will like them.

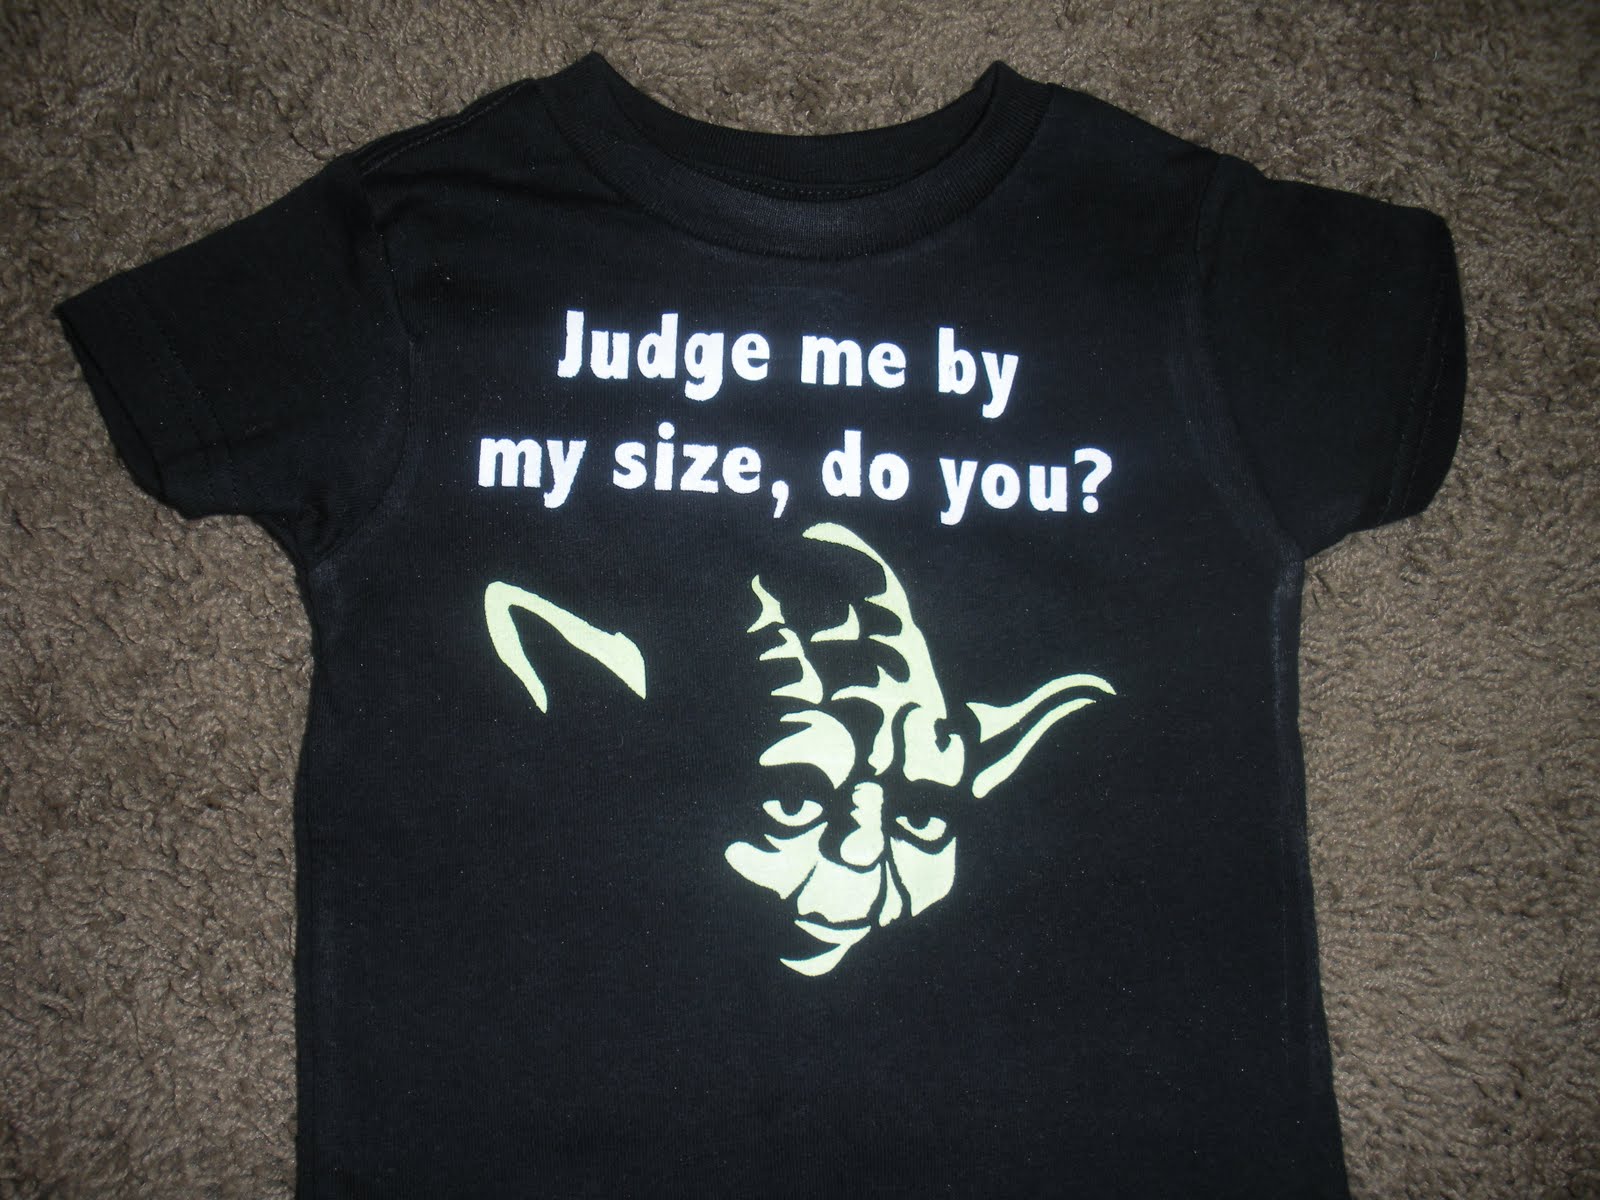
This little one is my FAVORITE. How cute is the little Yoda? (And, that is the correct quote, Kent watched the movie just to get it correct).
This is such a sweet little shirt for my little K. I got the template from
http://papercutting.blogspot.com/ (LOVE her art by the way) She calls it "Love Lasso", and I think it is adorable. It is perfect for Valentine's day, but is cute for all the time too.

This adventurous little guy reminds me of my nephew, so this will be his for his upcoming birthday. The origin design is from the site above, but he didn't have a cowboy hat. I thought if my little nephew was ridding a dinosaur, he would definitely wear a cowboy hat, so I added one.
This is for Kent. I was so proud of myself for the good idea. We kept it a secret the whole night (not easy to do), then he got on the computer. He said, "I really like the design with the Nintendo controller, can you make me one?" I had intended to give the shirt as a Valentine's Day present, instead I threw it at him (jokingly of course) and said something questioning his intelligence (or something like that).
Here is D's Green Lantern shirt. My funny little guy wanted Green Lantern underwear for Christmas when he was 3 or so (Ya, they don't make those. Thanks to good friends who made us some). Now, I think of him whenever I see the Green Lantern.
Oh, here is the link to the artwork http://outsiderzero.deviantart.com/gallery/

Happy Crafting All.

Tuesday, February 1, 2011

Birthday stuff

Wow, I hadn't realized how long it had been since my last post. Well, I have a few new and fun birthday ideas. I got a Silhouette machine for Christmas, and I have had lots of fun with it. Here is some of the fun things I have made.

My nephew L is turning 4 soon. He is having a Knight and Princess party, and we needed fun invitations. I thought about these knightly flags when I saw the flag images (that come with the machine). I made the dragons (downloaded it into the Silhouette program, traced and cleaned it up a bit). We printed off the party info, written in a knightly language of course, distressed them a bit and glued it to the back.
We then just used double sided tape to stick the small dowel rods on. I think they turned out pretty cute. To top it all off, they only cost a few $ to make and about 1 hour of time (it took us a bit longer due to little "helpers").
Here is a picture from my baby's first birthday (wipe a tear). He had a really fun cookies and milk party. I used my machine to cut out all the signs for the cookies, the ballon tags (circle with #1 inside) and the 3-D stars. The stars were really fun and easy to make. I made a star on my Silhouette program and then added perforated lines so it would fold in and out easily, making the star pop out.
I also made a couple of birthday banners that hung on the mantle and doorway. It was very inexpensive and I think it gave the party a fun touch.

Well, there you have it. Even moms get to have fun playing with their new toys. If you have a Silhouette and would like any of the images I made, just let me know. It is always better to share the love.

Happy Crafting.

Tuesday, November 30, 2010

Cheap and Easy Advent

I seem to always remember that I need to make an advent calendar for my family around the middle of November. I knew I would not get around to it again this year, so I decided to go another direction.

I saw these little gift boxes at the Dollar Store (in the wedding section) and started thinking. I bought 2 pkgs. of little boxes (12 in each), 2 tubes of baubles (12 in each and in 2 colors, one for each kid - to avoid fighting. Well until Bubby thinks he needs to help too.) and the tinsel rope. So, I spent $5 on supplies. I had glue, ornament hooks, and Christmas scrapbook paper (one had a Christmas countdown on it, and I always wondered what I was going to do with it), in my supplies.

I spent a few hours one evening, cutting gluing, and folding the boxes together. I think it was very easy, fairly cheap and the kids are super excited.
So, what kind of things do you put in your advent calendars?

Let the countdown begin!!!

Monday, November 29, 2010

Christmas time is here

I have actually been very busy crafting the past few weeks, but I can't share my creations yet. I have been busily making Christmas presents and I don't want to spoil the surprise for anyone. That said, I have had lots of fun, and I still have lots more to do.

I made this sweet little crochet hat a few weeks ago and I fell in love with the pattern (didn't my sister take a gorgeous pic of K?). So simple and so very sweet. My fabulous sister-in-law said she would love the pattern, so....
Here is a link to the pattern. I found it doing a search on Ravelry. If you are interested in yarn arts (knitting, crochet, etc). this is definitely a website you will love. It is free to join, and you can search and save the patterns you are interested in trying (free and purchased patterns). You can also share pictures of your creations and explain any difficulties you had (I have found it VERY useful to find out where other people have had problems and how they fixed it)

I have made a few more hats (like I said, for gifts) that are on my Ravelry page. If you are interested in looking me up, my name is Mury.

Hopefully I can add a tutorial on my fun and very inexpensive advent calendar very soon (if my kids don't destroy it first).

Enjoy, and good luck in your Holiday crafting!

Wednesday, November 3, 2010

More little dresses

Do you remember this easy little dress? Well, I finally made some cute little under clothes to put underneath. I just used my favorite pattern (Simplicity 5695) to make the little shirt. For the pants, I traces a pair of pj's on freezer paper and added 1/2" for seam allowance and 1 1/2" or so on the top for the waist band. They actually came together really easily. After they were sew, I added three layers of ruffles to the bottom. (I think they were 3" long and double the width of the pants. I serged the raw edges and then gathered and stitched them on the pants.)

I also made her a little simple dress using the Simplicity pattern. I made a sheath type dress (just a long front and back, no attached skirt) and just added ruffles to the bottom (same as the pants). One note on my fabric choice. Can you guess what it is.....that's right a sheet. I needed something with a little polyester in it so it wouldn't wrinkly like crazy and (like 100% cotton would). I bought one twin flat sheet for $3 and it made the pants, shirt and under skirt. I have washed it, and it washed up fantastic and it is still soft.

I have a white sheet too and I think it will be fantastic too. I plan on making more little dresses (in Fall and Christmas patterns, so excited) K also wants a blue Belle dress (the peasant dress Belle wears on Beauty the the Beast), and I think this patter will work wonderfully.
Here is my little princesses Halloween costume. Can you guess which pattern I used? Simplicity 5695. Now when I say that is the pattern I used, keep in mind that I lengthened the bodice, skirt and sleeves, added the ruffle to the bottom of the sleeve and used shirring around the neck, sleeves and in the back. Here is the link for the flower. It was really easy, and fast (my new favorite). I tried to make a bigger flower by making cutting it wider and longer, it was too much.
A few of you have noticed that the pattern does not go past a 3T (I think?). I have been modifying my pattern so much, I didn't notice :) But here are the bigger girl patterns that are the same concept. Simplicity 2377, McCalls M6062, and I fond this one at a thrift store Simplicity 5222 (not sure if it is out of print). So, keep your eyes out for pattern sales. Good luck.


Tuesday, October 12, 2010

Yes, I am insane

I know this costume is time consuming, but it is so dang cute! I thought I would share where I got the patterns.
The body suit (I obviously did this in one color and I also did buttons instead of snap tape. The pattern has a few flaws in it, so be sure you read the whole thing first and look at the diagrams)
Hat (I added different colors to the top, cream and red, and added a pom, pom on top.)
Booties (I don't think I actually had a pattern, but you can google crochet baby bootie patterns or go to RAVELRY to find tons of patterns)
Ears- I made 4 ears, 2 tan and 2 cream. Then I put a tan and a cream together and sc around the outside of the ear. I left a long tail at the end and stitched it to the side of the hat.)
sock monkey doll (How cute is this little guy? I added a bell to the inside to make him more interesting. I also crochet eyes on him for safety reasons.)

It really wasn't that bad. The crochet went quickly, but the assembly was slow. On a side note, if you are interested in knit or crochet you should check out RAVELRY. It is a fantastic place to find patterns and to see other peoples' creations.

Wednesday, September 15, 2010

One pattern, so many dresses

I thought I would share one of my favorite dress patterns with all of you. This is my FAVORITE go-to patterns with so many variations. With Halloween quickly coming, here are a few of the dress variations I have made.

I use this Simplicity pattern (5695 view E) , and poly satin from Hobby Lobby ($2.99/yd. and it is AWESOME to work with and washes really well. NEVER buy the Wall-Mart stuff. I usually need 1 yd for a simple dress and 1 1/2 yds for a fuller dress). Before you jump in and cut out your fabric make sure you measure your little princess and check it against the pattern. I have made my own pattern (using the original as a guide) and I made the bodice longer and thinner, the sleeves longer (they are pretty short in the original) and lengthened the skirt depending on the look I want (my little one is very tall and very thin). I also really like to use elastic thread to do shirring on the neck, sleeves and waist (but you could use regular elastic like the pattern says).

Whew! Okay now the fun.

This is the wedding dress up dress I made for K's birthday. It is a very simple dress with shirring in the neck and sleeves. I added satin poppies around the collar (she added the belt). The veil is just a bit of tulle that I folded in half, gathered, glued on a head band and added satin poppies on top.
Snow White. This is just a basic dress, with different colors. I cut a yellow skirt, dark blue top and light blue sleeves. After the sleeves were cut, I used fusible web tape and used it to iron on red ribbon in stripes down the sleeves. Before I attached the bodice to the skirt I added some gold braid trim down the front of the dress. (K informed me that I left of the big white collar and cape, but oh well. And don't you love how happy she looks).
This is K's nutcracker dress. It is just the basic dress with a long skirt. At the bottom I gathered a 5" strip of black satin (cut it 5" long, and it should be twice as long as the bottom of the dress) ruffled it and added it to the bottom of the dress. I then added a sash out of a long pice of black satin and added satin/organza flowers to it.
My little Beauty (although she was a bit of a Beast that night). Okay, this one took more work but was still pretty easy. The quick version, just a basic dress using view F, I shirred the neck, sleeves and waist. I also took the top layer of the dress and gathered it up a few times(just took a needled and put a few stitches in to gather it up a bit). The neck/shoulder piece was actually the most difficult. I made a tube a little bit bigger than the ungathered neckline. I gathered it in three spots and attached it to the front and back of the dress and added a flower to the front (if you need details on this one, let me know)
Cinderella (now too small, so sad) was made out of cotton for a fun Disneyland dress. Again it is the basic dress pattern with shirring at sleeves neck, and waist, just add white sleeves and the white bustlelie thing at the skirt (it is just a skirt shorter than the bottom layer and I cut it in the middle and rounded the corners).
I loved Tinkerbelle. It was made the same as Cinderella. I just changed the skirt a bit. I made a template for this one using freezer paper I traced out the skirt pattern, cut it shorter and made the scalloped pattern (so it was evenly spaced, it took a little math).
Okay, I hope this helps those of you who have asked. I know it is all a bit jumblee and confusing, so if you have more questions please contact me and I will be happy to help. The real trick is to just use your imagination. If you see a dress you like, just think of how you can de-construct the pieces into different colors and shapes.

Good luck and happy sewing.

And yes my daughter is sooooo very spoiled.